When your friends and family ask, "What makes this taste so good?"...
You can proudly say, "It's My Rub!"
When your friends and family ask, "What makes this taste so good?"...
You can proudly say, "It's My Rub!"

Pulled Pork or Chopped Pork Boston Butt Summary:
In-Depth Pulled Pork or Chopped Pork Boston Butt Recipe:
I have probably smoked 35 to 40 pork butts over the past seven years, some on an offset smoker and on my XL BGE (Big Green Egg).
What I am Looking for in a Boston Butt
I grew up in the South where barbecue was pork…period. Specifically, the cut was called Boston butt. It was served sliced or chopped. I was in my late 30’s before I ever heard of “pulled pork”, but I found that I love it served that way. I am extremely partial to “chopped pork” and “pulled pork” over sliced Boston butt. I have never served it sliced. So, for that reason, the following technique that I use focuses on “chopped pork” and “pulled pork”. If you happen to use this recipe and technique and serve the pork sliced, let me know how it turned out.
So, what am I looking for in finished Boston butt before and after it is chopped? I want to see a nice mahogany bark on the outside. When cut, it should have a nice pink smoke ring just beneath the surface. The bark should have wonderfully favorable seasoning that enhances the natural flavor of the pork, while having a slight tanginess that blends with a mild smoky flavor. When chopped or pulled, the pork should be moist and have a hint of those same flavors that carry throughout the meat. I am looking for barbecued pork Heaven!
Back to top
Buying Meat
What you are ultimately looking for is a pork shoulder. As the name implies, it is the upper part of the front leg of a hog. The whole shoulder usually weighs between 12 and 18 pounds.
When not sold whole, the pork shoulder is usually sold in two sections. The upper section is cut in rectangular shape and is called the “butt” or “Boston butt”. The lower cut section of the shoulder is more triangular and is known as the “picnic” or “picnic shoulder”. The picnic usually has more bone to it. If the picnic is cured, it is called a “picnic ham” (you don’t want this as pulled pork).
Sometimes grocery stores will sell a cut that is called a “pork shoulder roast” or “blade roasts”. These are cuts from the top of the shoulder and is, basically, a division of a Boston butt. Sometimes these cuts have a bone and sometimes not.
The name “Boston butt” came from Colonial America when pork was shipped to the colonies through Boston ports in barrel like containers called “butts”. Butchers in Boston developed this way of cutting the pork shoulders, thus derived the name “Boston butt”.
Any of these cuts can be smoked to create pulled pork or chopped pork, but I prefer the upper shoulder in the form of a Boston butt or a pork shoulder roast.
What to look for when buying your meat:
Apply “It’s My Rub!” Power Blend or Smooth Blend (Dry Brine)
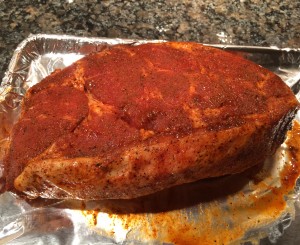 I apply “It’s My Rub!” Smooth Blend, but Power Blend works well too. If using Smooth Blend, apply a layer of kosher salt prior to applying Smooth Blend. Cover the meat generously with the rub and let it “dry brine” for at least 8 hours up to 24 hours. However, for the absolute best results, apply the seasoning and then FoodSaver/vacuum seal the meat for 4 to 6 days. This really gets the flavors into the meat.
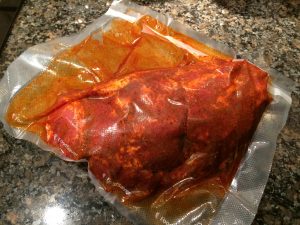
If you need to get flavor into the meat faster, you can wet brine the meat. See Brining below or skip to the next section.
Another method that works well is to cover the meat with mustard and then apply the rub. Follow the same steps as above. Try it both ways and let me know which you like better.
I prefer the above method of dry bringing, but if I need have the pork done faster I brine the pork butt for 24 hours. This allows me to still get the flavors into the meat and provides for extra moisture in the finished product. After brining, remove the pork from the brine and rinse with cool water. Pat the meat dry completely. Rub the meat with vegetable oil and then cover generously with “It’s My Rub!”. If using Smooth Blend, apply a layer of kosher salt to the pork prior to applying the rub. Return the meat to the refrigerator for at least 2 hours prior to smoking it.
This is an optional step, but it does increase the flavor and moistness.
Click HERE to go to our pork and chicken brine recipe.
Loading the Big Green Egg with Lump
I prefer oak lump charcoal and really like “RockWood Lump Charcoal” , Ozark Oak Natural Lump or Royal Oak. Some lump just has a nasty flavor that it imparts into the meat. You want to choose a clean burning lump.
I typically load the lump up to the fire ring in the BGE. You will want to use the Plate Setter (convEggtor) after starting the coals.
Clean smoke refers to the smoke that comes off of the fire after the impurities have burned off and you get a nice and natural smell from the wood that you are using to create the smoke. When you first start a fire, you will get a lot of white/grey smoke that has an acrid smell. You want to wait until the acrid smell burns off before putting your meat on to cook. You can also get acrid smoke from fat dripping down on your coals to avoid this, use a raised drip pan. A good way to tell if your charcoal is burning clean is to put your hand above the smoker and let the smoke hit your hand. Smell your hand to see if this is the smell/flavor you want in your smoked meat.
Plate Setter (convEggtor), Drip Pan, Grid and Water Bowl
On the Big Green Egg, you use the Plate Setter (convEggtor) to turn the BGE into a smoker/convection oven. In addition, when cooking meat you will want to use a drip pan to catch the meat drippings. You need to elevate the drip pan off the plate setter to keep the drippings from getting too hot and creating acrid smoke. To do this, create three spacers by balling up aluminum foil into 1” balls. Place the aluminum balls on the plate setter followed by the drip pan on top of the aluminum balls. In other words, put the Plate Setter in the BGE and then place the aluminum balls on the plate setter in three places to support your drip pan. Put the drip pan on top of the foil balls, then place your grate/grid in the BGE.
Place a small aluminum pan filled with water on the grate while cooking the meat. This will help keep the meat moist and promotes a better smoke ring in your meat.
Get your temperature regulated on the BGE before adding your meat.
Setting up a Metal Grill to Cook Using Indirect Heat
You can smoke meat on whatever device you have. If using a metal grill that does not have a heat deflector like the BGE’s Plate Setter, you will want to stack you coals on one side of the grill and cook the meat on the other side of the grill so that the meat is not above the coals. This is called indirect cooking. You will also want to align the lid so that the air vents are on the side of the meat to create a heat convection and to direct the smoke across the meat.
When loading my lump I use both hardwood chunks and hardwood chips. I prefer pecan or hickory chunks and place them evenly spaced about 6 inches from the middle of the fire ring on top of the lump. I then sprinkle applewood chips over the surface of the coals. This provides constant smoke as the coals burn from the middle outwardly.
I have never found an advantage to soaking the chips or chunks ahead. The coals typically burn from the center outwardly and by the time the fire reaches the majority of the chips, they have long dried out anyway.
Starting your Smoker and getting it to Temp
Starting a Big Green Egg for a low and slow cook is much different than offset smoker or metal grills. The BGE is very well insulated and maintains heat and temperature very well where as a metal cooker loses heat and temperature very fast. Therefore, when starting a BGE for low and slow, light the coals in the middle and let the BGE come up to temperature slowly to a dome temperature of approximately 260 degree’s (grate temp about 250 degrees). I usually light my BGE about an hour before putting on the meat to get “clean smoke” and to stabilize the temp by adjusting the openings at the top and bottom of the BGE. If you start your BGE and the temp gets too high, it can be very difficult to get the temp back down and can waste a lot of time. Tend to your fire during this phase.
With metal cookers, you usually will get the fire hotter at first and place you meat on at a higher temperature, usually around 325 degrees because you will lose a lot of heat when putting your meat on the cooker.
Placing the Meat in the Smoker
Place the meat on the BGE in the middle of the grid over the drip pan. On the BGE, I typically place the meat with the fat cap down, because the heat source is from the bottom. This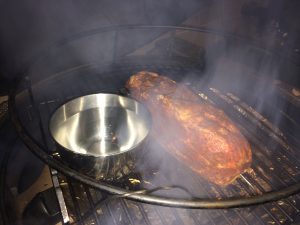 protects the bottom of the roast from getting overdone. If you are using another type of smoker, place the meat where the smoke and air can flow evenly over the meat. Monitor the temp periodically over the next couple of hours to make sure that the temp is stable.
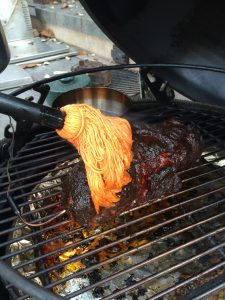 Mop the meat with the mopping sauce every 2 hours until you reach 165 degrees. Click HERE for the recipe to the mopping sauce.
Mopping the meat is optional, but I do believe that it adds and moisture and flavor to the meat. That said, this will increase your cook time considerably. Also, smoking pork shoulder roasts are extremely forgiving and maintaining moisture in the meat is much easier than other meats like brisket.
Wrapping vs Not Wrapping During the Cook
I prefer to wrap the meat in butcher paper about the 165 degree mark, but you don’t have to wrap the meat at all, especially on a BGE. Butcher paper absorbs the fat and lets it drip through while protecting the meat and keeping in the moisture. I usually mop the meat once more just before wrapping.
Some folks prefer to wrap using aluminum foil and then add margarine, juice, brown sugar, etc. Though I have eaten some tasty meat cooked in that method, I prefer not to use that method, because I think foil creates a steaming effect that renders out too much of the flavorful pork fat. It is the fat that holds the flavor and I think the margarine is replacing the good pork flavor with the flavor of margarine and brown sugar.
Wrapping will reduce the time that it takes to cook the meat.
When cooking meat and other meats, you may notice that the internal temperature of the meat will get to a certain temperature, around 165 degrees, and then will stall, not increasing sometimes for hours. I have actually seen the internal temperature get up to 170 degrees and then start to fall all the way down to 158 degrees without a change in the cooker’s temperature. This is called the stall phase and requires nothing from you except patience. That said, wrapping the meat when it reaches 165 degrees helps to decrease the length of time of the stall.
What is happening? My understanding of this is limited, but I have read that it is caused when moisture evaporates from the surface and the evaporation effect itself causes the meat to cool just the same way that perspiration helps to cool you on a hot day. Found here: http://amazingmeat.com/tips_and_technique/the_stall.html
I usually take meat off when the internal temperature is between 192 and 198 degrees. However, if you plan on doing “pulled pork”, consider taking it off between 198 and 203. This
will allow for easier pulling. I usually test the doneness by lifting the meat in the middle with tongs. If the meat provides a little sag on the ends, it is done. Another method is to probe the meat. A probe should slide in like going into butter.
I wrap the meat with another couple of sheets of butcher paper and put them in a Styrofoam cooler for at least an hour and up to 5 hours prior to chopping. Cover with a towel to hold the heat in. The meat should not be allowed to get below 140 degrees, to keep it safe to eat.
If your meat is falling apart, it is overcooked. Also, every degree above 203 degrees is a loss in flavor. Flavor is in the fat and connective tissue. When the temperature goes too high, there is no way for the proteins to hold the flavor molecules and you might as well have cooked the meat in an oven because you will have lost all the smoke and flavors that you worked so hard to get into the meat.
I prefer chopped pork over pulled pork because I think the chopped pork maintains its flavor, moisture and texture much better than pulled pork. Fat and connective tissue are where flavors are stored, not in the protein strands. When you pull pork strands apart, you are breaking down the natural moisture and flavor barriers within the meat itself.
I have a tool called “Bear Claws” that I use to pull pork into stand. However, if you take two large forks, one for each hand, this will do the job.
Firstly, cut the meat across the grain into 1 to 1.5 inch strips. When you pull the pork into strands, this will make it so that the strands are only 1 to 1.5 inches long. To pull the pork, drive the two forks down into the pork strips and pull the pork strands apart until all if the pork has been shredded.
I suggest that you take some of the drippings from the pork roast (1/4 cup) and mix it with 1/2 cup of apple cider vinegar. Pour it over the pulled pork and mix it all well. Alternatively, pour about a 1/2 of the Mopping Sauce or “It’s My BBQ Sauce!” over the meat and mix well.
Enjoy!
Chopping the Pork
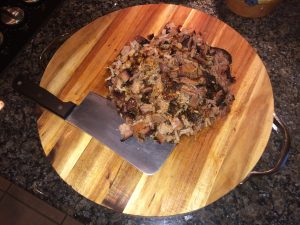 Cut the pork shoulder in the 1 to 1.5 inch cubes. Then take meat cleaver or two meat cleavers and chop the meat to the desired consistency. I do not suggest using a food processor, because it can over process the meat and turn it to mush.
As above, I suggest that you take some of the drippings from the pork roast (1/4 cup) and mix it with 1/2 cup of apple cider vinegar. Pour it over the pulled pork and mix it all well. Alternatively, pour about a 1/2 of the Mopping Sauce or “It’s My BBQ Sauce!” over the meat and mix well.
I wish that I could let you taste this sandwich right now! It is “Slap Yo Momma” Good! I didn’t even put any BBQ sauce on it. The flavors of the pork and seasonings just make you 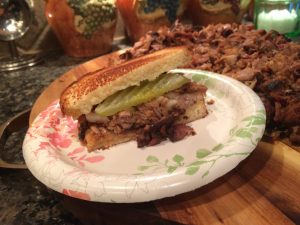 say, “WOW!”
On the pork, before making a sandwich, I add just a little of the mopping sauce.
What is on the sandwich? I took two slices of potato bread and put a light coat of Duke’s mayonnaise on them. I put the bread together and then toasted each side of the, what will be, sandwich. I then added the luscious and delicious chopped pork. I added some chopped sweet onions and a sliced dill pickle.
Barbecue Dipping Sauce
Click HERE for the recipe to the barbecue sauce.
I hope this helps with your first, or next, pork butt! And, when people ask, “what makes the taste so good?”…you can proudly say, “It’s My Rub!”
Thanks for reading!
Bruce and Kelley Underwood
Copyright 2014 Underwood’s It’s My Food!, LLC
907 Farm Path, Brenham, TX 77833| Email:
bruce.underwood@itsmyrub.com | Phone: 512-635-6052
Copyright 2021, Underwood's "It's My Food!", LLC. All Rights Reserved.